How to Read in .dat File in Vivado
Installing Vivado, Xilinx SDK, and Digilent Board Files
Introduction
This guide will prove the process of installing and configuring the Vivado development environs, used for developing projects to run on Digilent FPGAs. In addition to the installation, Vivado will be pointed at Digilent'due south board back up files, which are used to make the process of creating a new project significantly faster. In addition, the board files make it significantly easier to add a variety of peripherals (such as DDR retention) to a projection. Xilinx SDK, used for developing C/C++ projects that target your hardware designs created in Vivado, volition be installed as part of this procedure.
Of import: With the release of Vivado 2019.ii, Xilinx introduced the Vitis Unified Software Platform. The installers differ slightly between versions after and before this point. Take a await at the Installing Vivado, Vitis, and Digilent Lath Files guide instead if you want to install version 2019.2 or newer.
Prerequisites
-
40+ GB of free hard-bulldoze infinite. The actual number varies depending on the specific tools and device support installed.
Guide
ane. Install Vivado
Note: While the screenshots for this guide were taken for Vivado 2017.iv, the installation process has not substantially changed in newer versions (through to 2019.1, at time of writing).
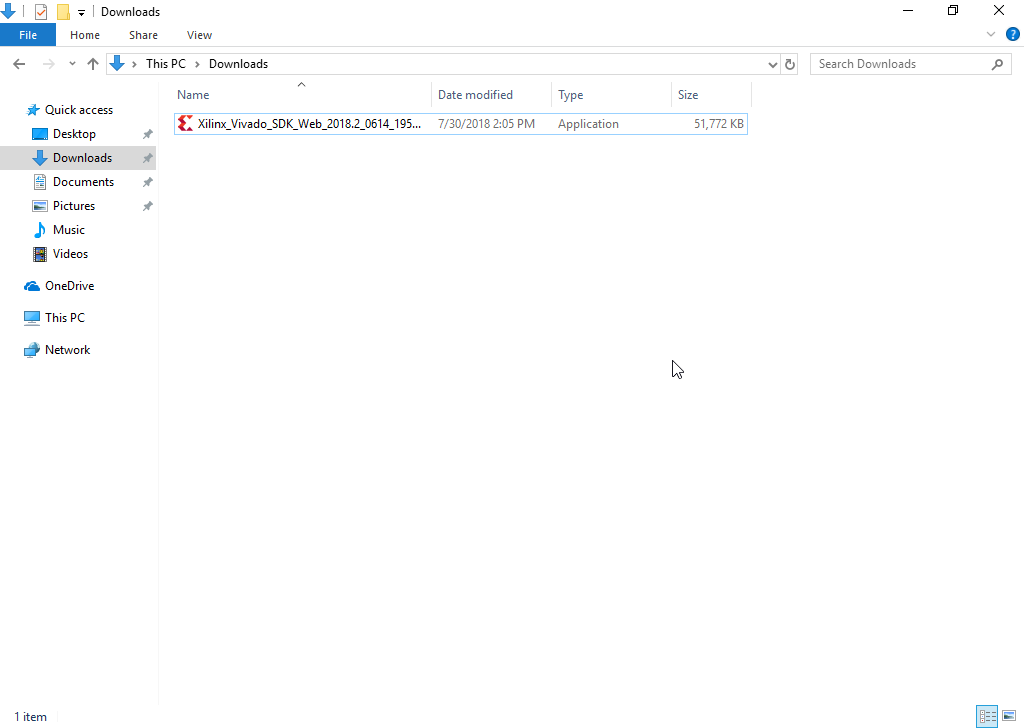
Open Xilinx'southward Downloads page in a new tab. Open up the "Vivado Archive", and navigate to the version you want to install. Find the department of the page entitled "Vivado Design Suite - HLx Editions - (version number) Total Product Installation". Select the "Cocky Extracting Web Installer" download for the advisable operating organisation. Follow the prompts to sign in or create an business relationship for Xilinx's website. Once signed in, the net browser volition download the selected installer.
Important: Digilent-provided case projects target specific versions of Vivado and it may exist difficult or impossible to port them to other versions. Take intendance when choosing a version.
To launch the installer, cull the dropdown for the advisable operating system, and follow the instructions:
- Windows
-
Use Windows Explorer to find the installer executable in the Downloads directory. Double click on the executable to run it.
- Linux
-
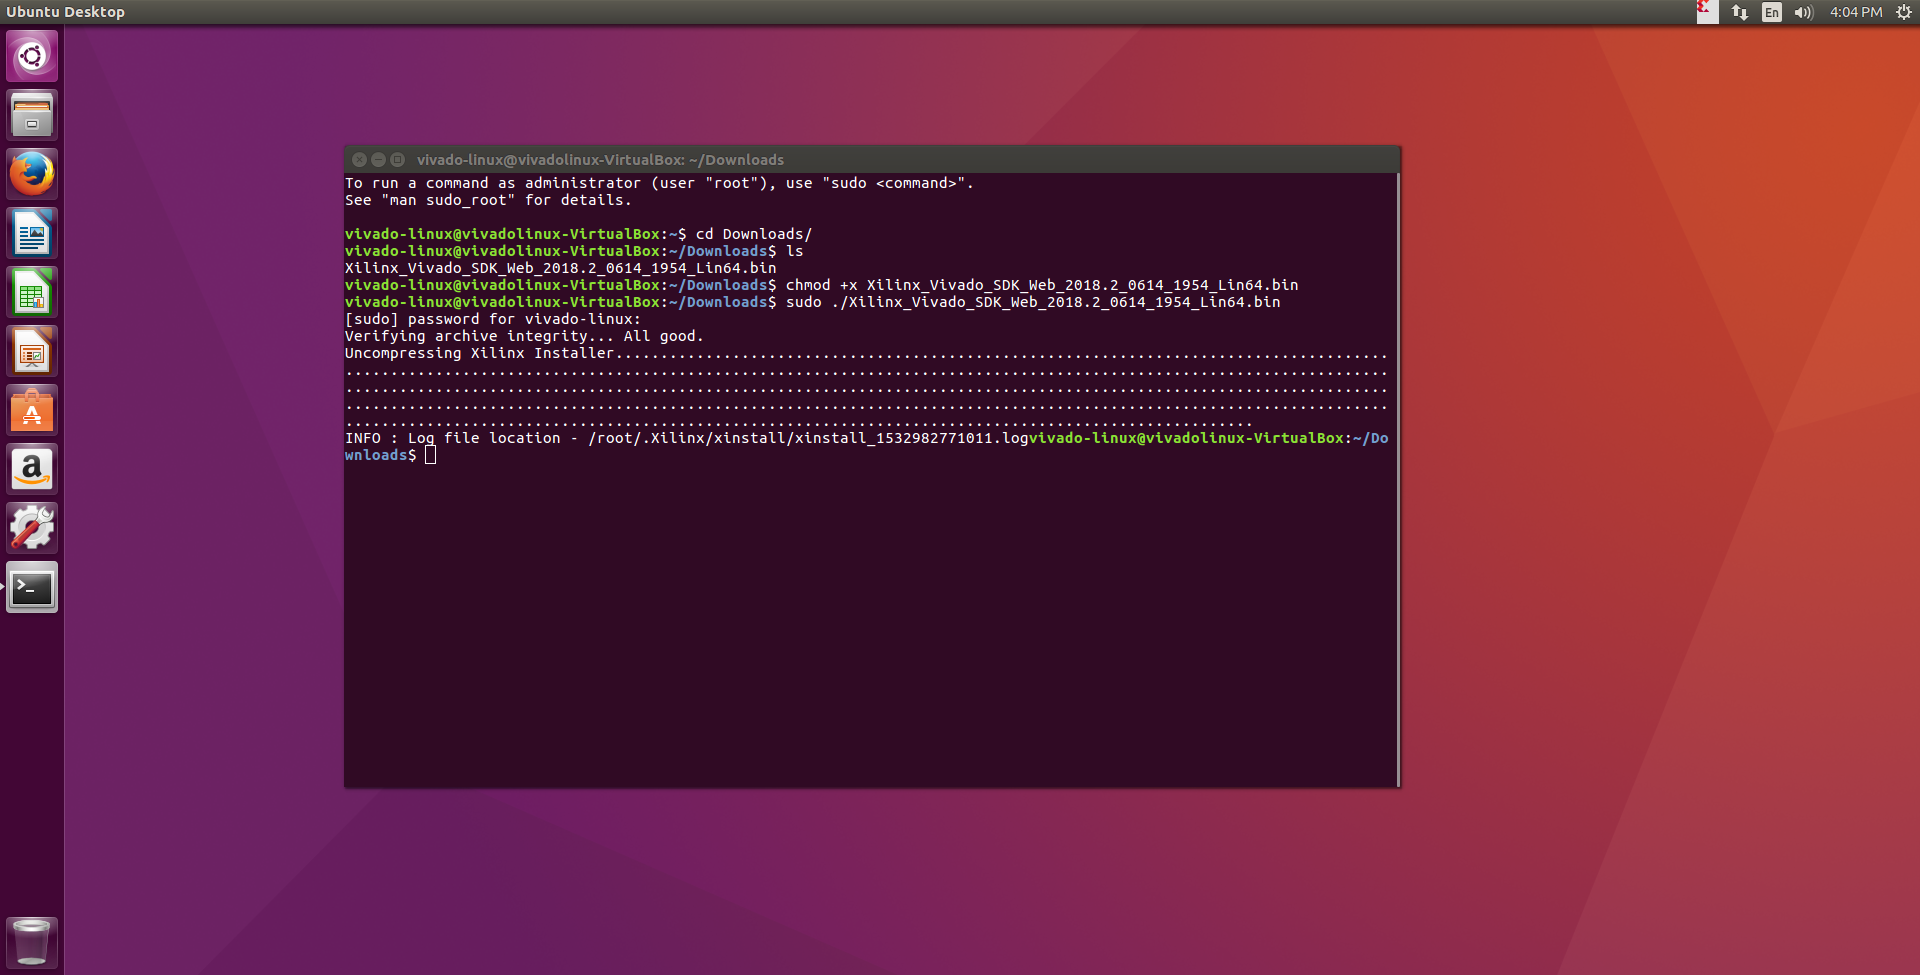
Navigate to the directory that the installer binary was downloaded to in a concluding application, then enter the command below with the right filename to execute information technology as a super-user:
chmod +ten <installer>.bin && sudo ./<installer>.bin
Note: All apply of Vivado in Linux should be done as a super-user.
The rest of the steps in Section 1 are the same for both Windows and Linux.
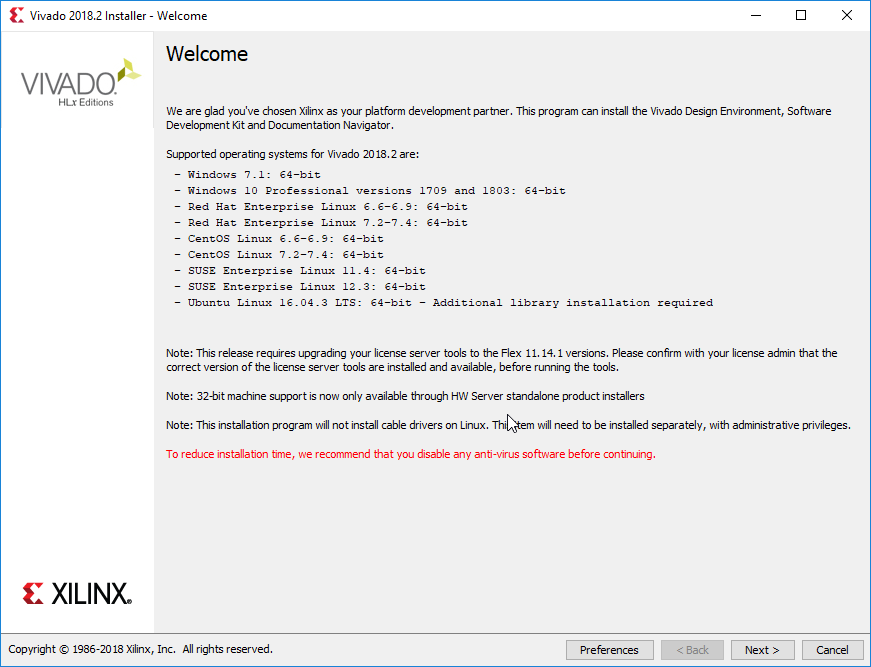
At the Welcome screen, make sure that the operating system of the figurer being used is listed in the compatibility list, and so click Adjacent.
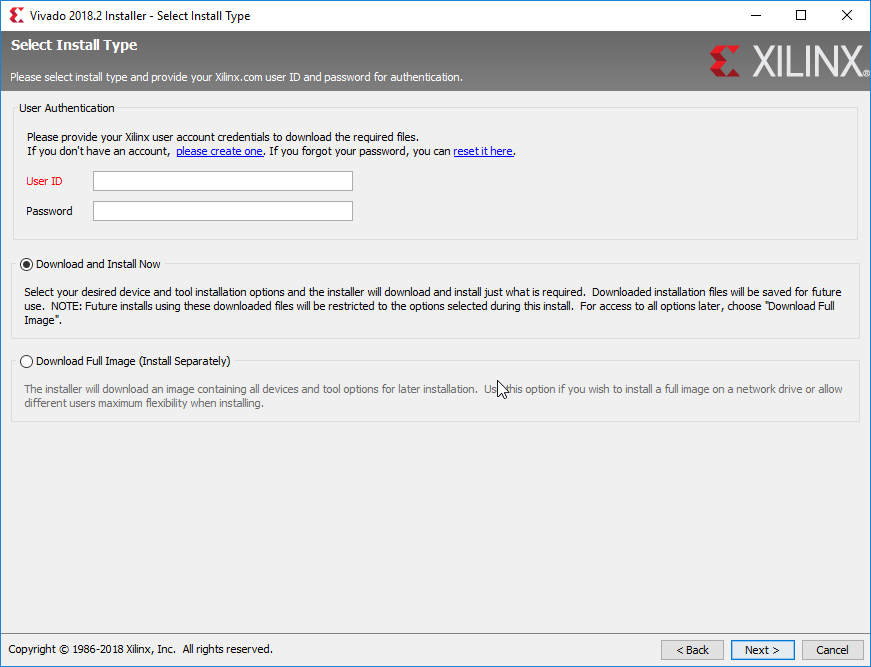
Use the same credentials equally on the Xilinx website for user authentication. Select the Download and Install Now choice and click Next.
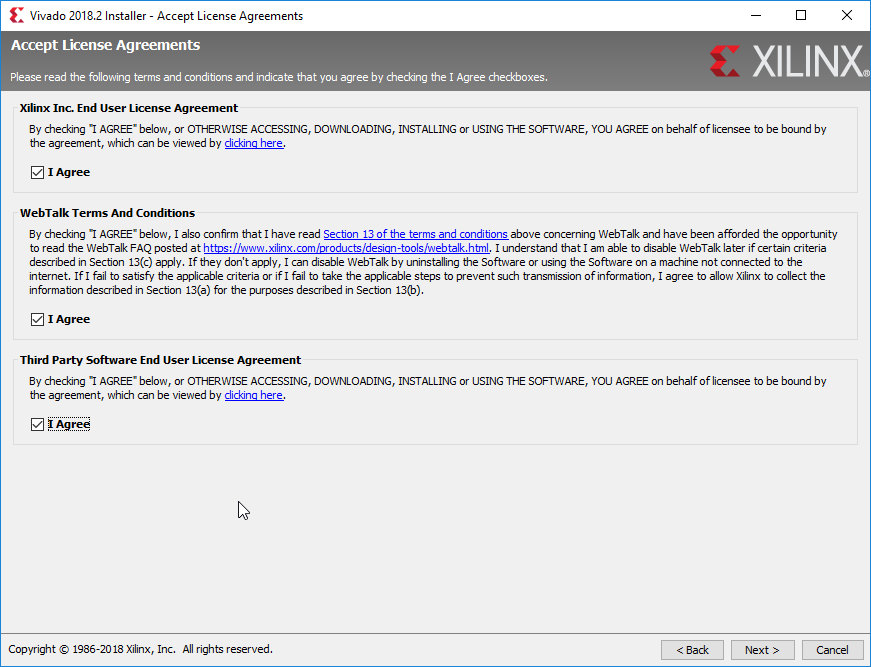
Read and accept all three license agreements, and so click Adjacent.
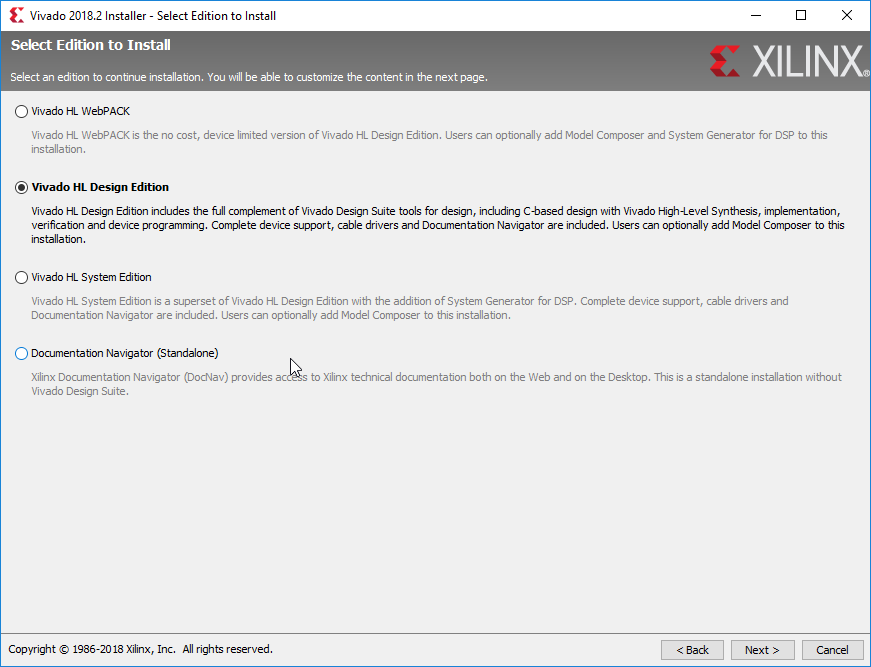
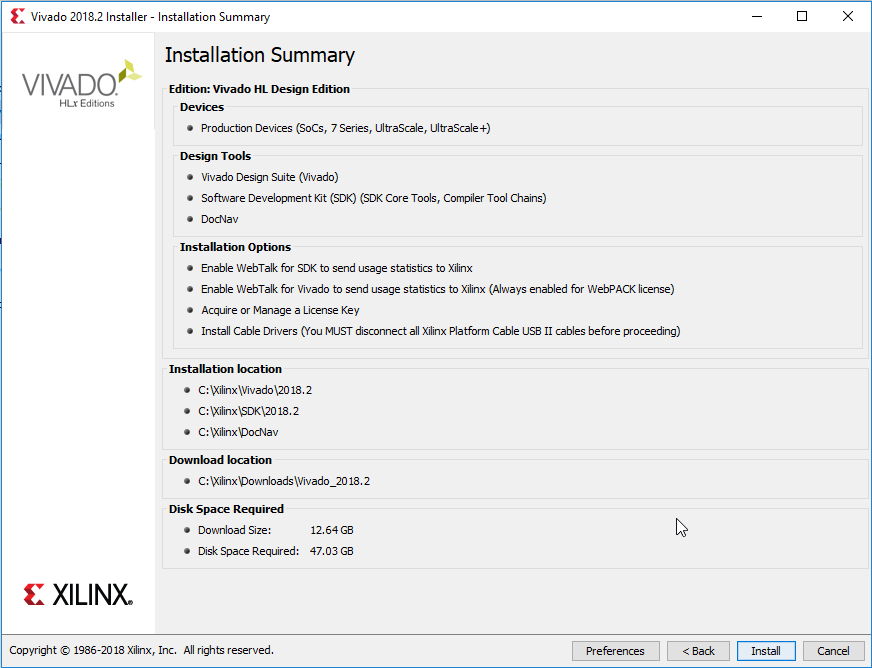
On the "Select Edition to Install" screen, several options are presented. Vivado WebPACK Edition is fully free, but will not piece of work when developing for Digilent FPGAs that use a Kintex-7 or Virtex-7 part. Vivado Design Edition can be used without a license, and is the edition recommended by Digilent. A license is required to use Vivado System Edition. This guide does not cover the conquering and management of licenses. Select the most appropriate edition for the situation, then click Next.
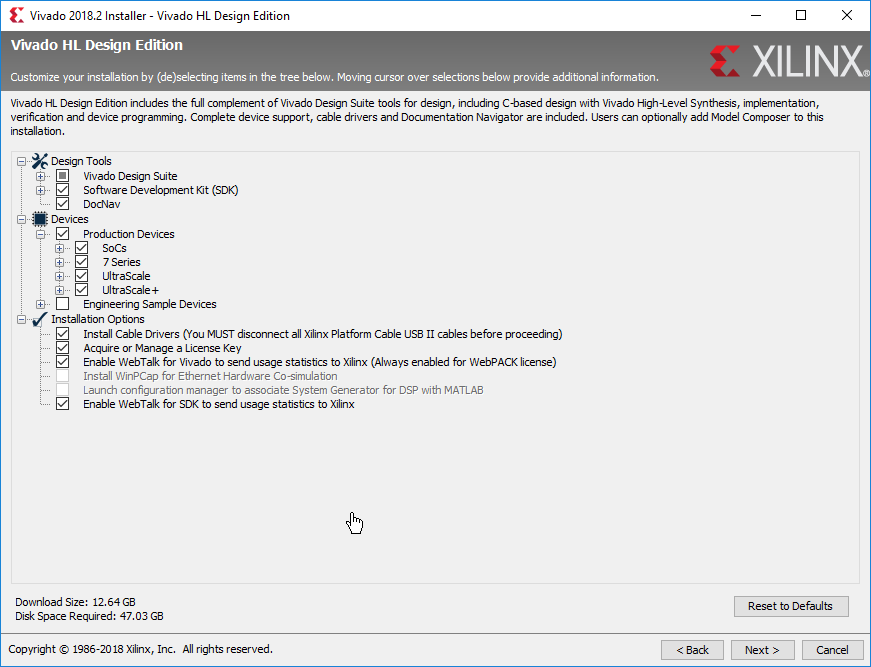
This screen provides more detailed options for the customization of the installation. The majority of these options do non need to be inverse for a basic installation, merely unnecessary features tin can be removed to reduce the installation's footprint on the file-system - for example, most users will non need their Vivado installation to support Ultrascale, Kintex, or Virtex devices. The important options for a beginner to note here are described in the list below. Review the selections, and so click Next.
-
Design Tools:
-
Vivado Design Suite:
-
Installs the main Vivado evolution surround.
-
-
Software Evolution Kit:
-
Installs an Eclipse-based development environment for Microblaze and Zynq designs.
-
-
DocNav:
-
Installs a navigation tool to chop-chop find advisable Xilinx documentation of IP and examples.
-
-
-
Devices:
-
Allows customization of the set of Xilinx FPGA parts that can exist designed for after installation.
-
-
Installation Options:
-
Install Cable Drivers:
-
Installs the appropriate drivers so that a continued FPGA tin can be programmed. If Vivado has not been installed before, make sure to check this!
-
-
Acquire or Manage a License Central:
-
Launches the Xilinx License manager after installation is complete. Most users do not need to manage licenses.
-
-
Note: Changes tin be made to the installation subsequently it is complete by selecting Add Design Tools or Devices nether the Help carte du jour in the Vivado toolbar.
The "Select Destination Directory" screen shows how and where the installation will exist placed in the calculator'southward file system. Leaving all of these settings as default is typically fine. Click Next and and so Aye if prompted to confirm that the installer will be creating a new directory.
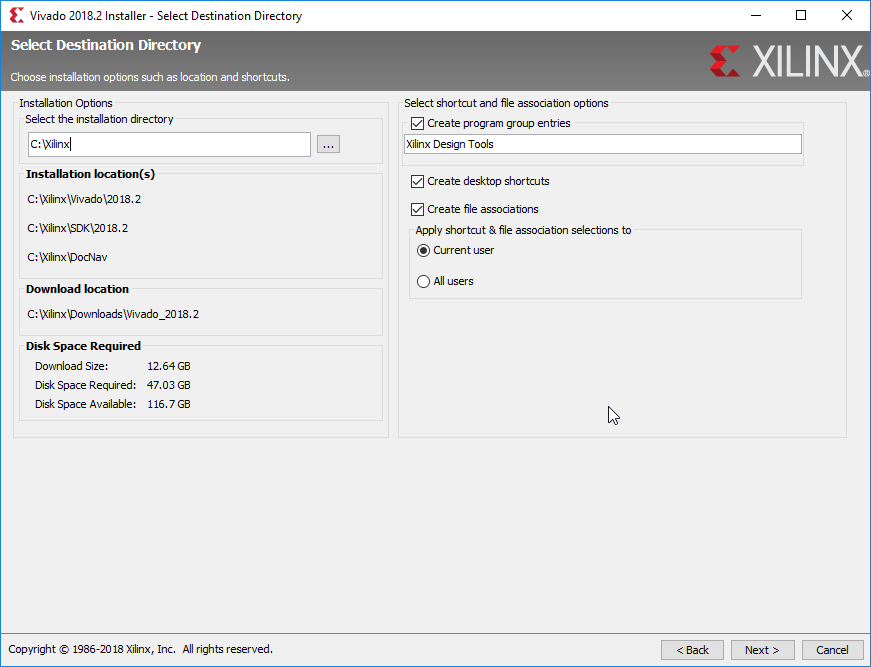
Review the "Installation Summary", and then click Install.
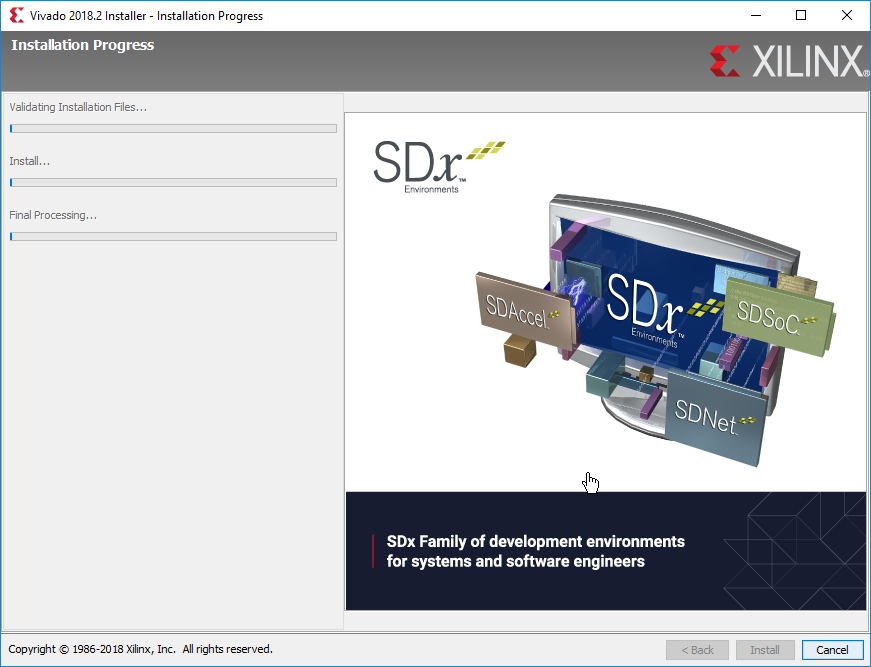
The installation process will take quite a while, potentially more than an 60 minutes. Find something else to work on until it completes.
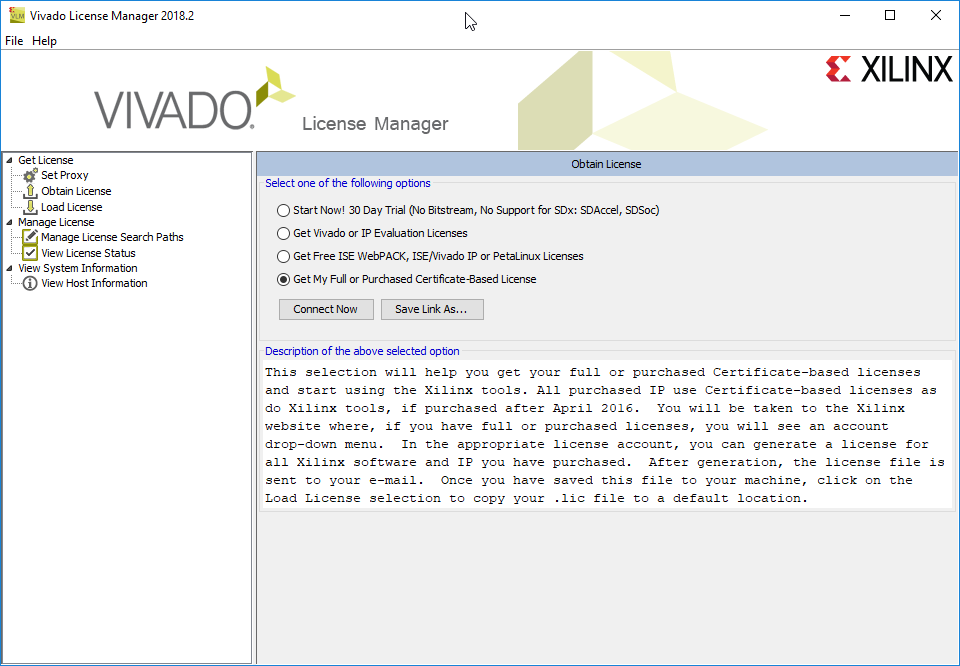
Vivado is at present successfully installed! If the "Acquire or Manage a License Fundamental" box was checked in Step 1.vii, the Vivado License Director will launch. The majority of users will non demand a license to use Vivado, and so the License Director can merely exist airtight.
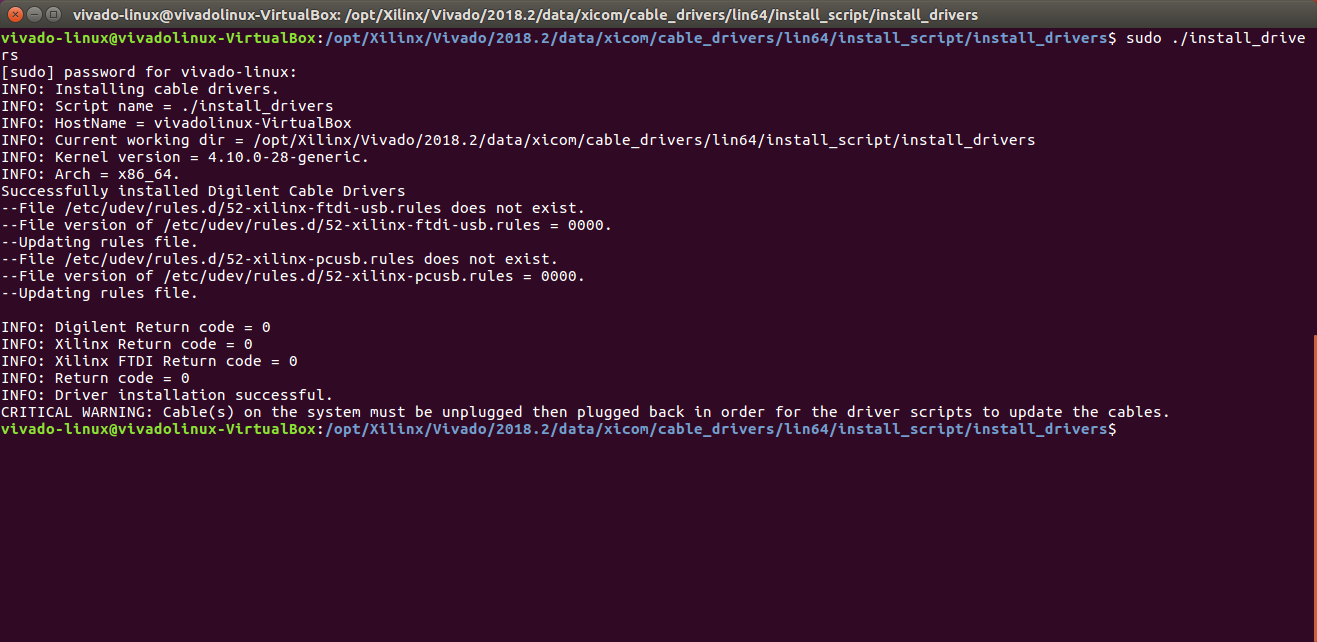
2. Installing Cable Drivers on Linux
Windows users may skip this section and continue on to Step 3.
The Vivado installer does not install the USB drivers required to recognize an FPGA on a Linux system, regardless of whether the option was checked or not. In order to install these drivers, navigate to the Vivado installation's data/xicom/cable_drivers/lin64/install_script/install_drivers/ directory in a console window. The Vivado installation directory is typically the /opt/Xilinx/Vivado/*/ directory - the "*" representing the Vivado version number (2018.2, for example). From within this directory, run the ./install_drivers control as a super-user. Once this control completes successfully, the required drivers volition exist installed.
Note: Some older versions of Vivado may require that the install_drivers command be extracted from a TAR file before apply.
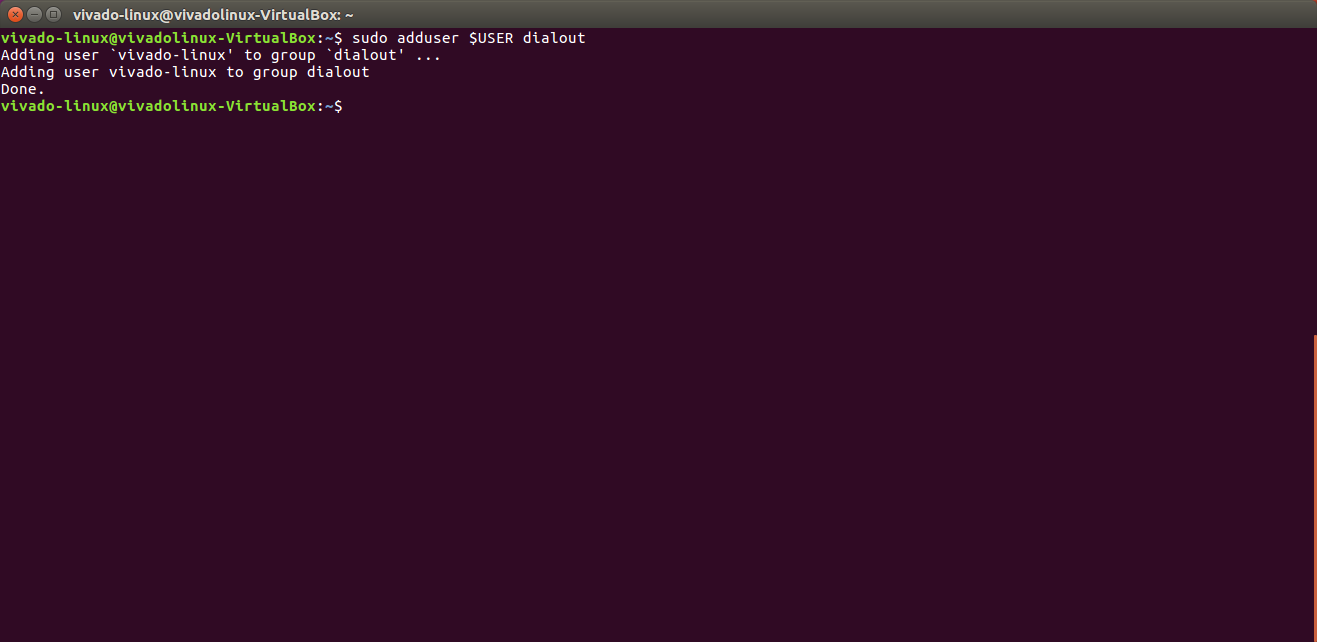
In order to apply the USB drivers with a serial terminal, each user that volition exist using serial terminals must be added to the dialout group. Serial terminals can be very useful for debugging FPGA designs that implement a USB-UART controller. A user can be added to the dialout group with the sudo adduser $USER dialout control. Note that this merely adds the user that is currently active. In society to add a non-super-user while authenticated equally root, use the control adduser <username> dialout instead, with "<username>" replaced with the name of the user to be added.
3. Installing Digilent Board Files
Digilent provides board files for each FPGA evolution lath. These files make it piece of cake to select the correct function when creating a new projection and allow for automated configuration of several complicated components (including the Zynq Processing Organization and Retentiveness Interface Generator) used in many designs.
The board files will be copied into your version of Vivado's installation directory. At the cease of this department, an alternate method of installation is presented, which users familiar with git may find more user-friendly.
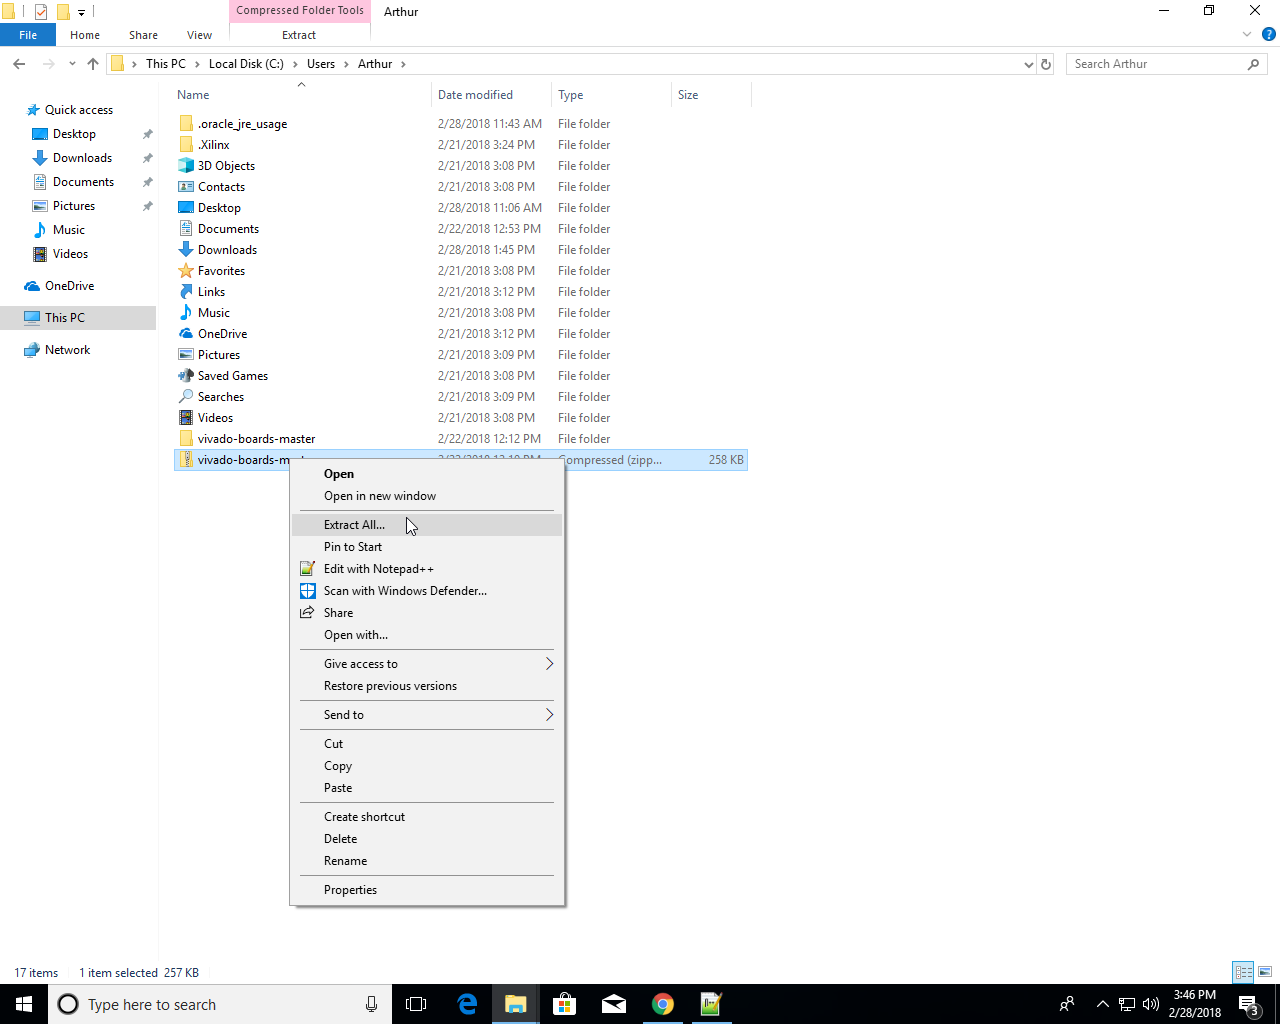
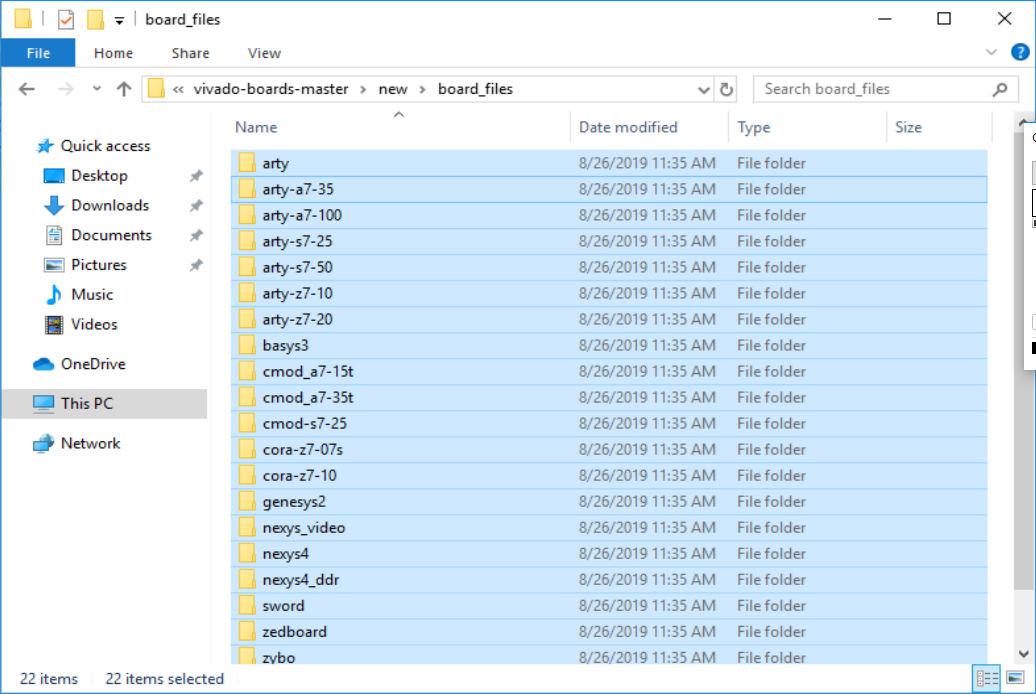
Open the binder extracted from the annal and navigate to its new/board_files binder. You will be copying all of this folder's subfolders.
Note: When installing Vivado versions 2014.4 or older, use the files found in 'old/board_files' instead.
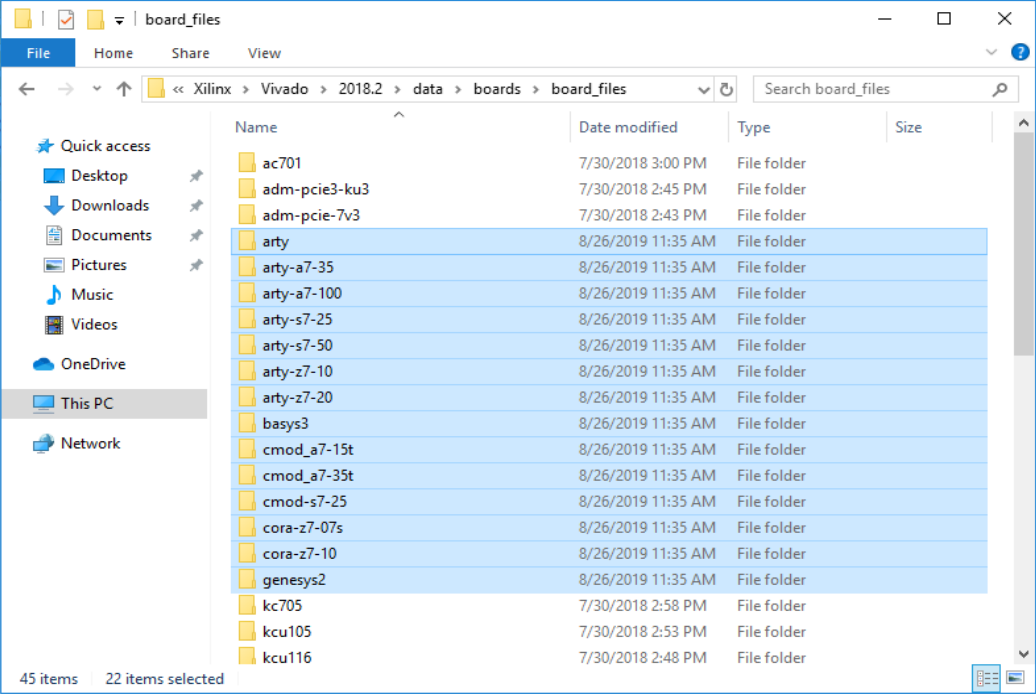
Open up the folder that Vivado was installed into - C:/Xilinx/Vivado or /opt/Xilinx/Vivado by default. Under this folder, navigate to its <version>/information/boards/board_files directory. If this binder doesn't be, create information technology.
Copy all of the folders found in vivado-boards' new/board_files folder, then paste them into this folder.
- Appendix: Installing the Board Files via the "vivado-boards" Github Repository
- Y'all might want to utilize this method instead if you are familiar with git and want to accept a clean way of pulling in the latest changes to the board files, without needing to manually copy-paste the files into every newly-installed version.
Download the ZIP archive of the Digilent's "vivado-boards" Github repository and excerpt it into a memorable location where it can stay. Alternatively, you can use git and a command prompt to clone the repository into the current working directory with the command
git clone https://github.com/Digilent/vivado-boards.
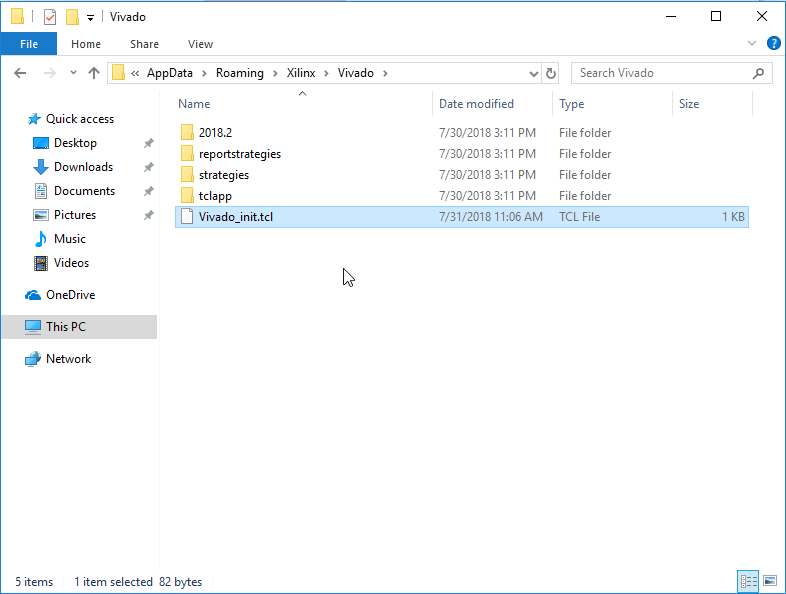
Notice the file "Vivado_init.tcl" in the "utility" subdirectory of the vivado-boards repo. Copy and paste it into the
%APPDATA%/Xilinx/Vivado/directory for Windows or$HOME/.Xilinx/Vivado/(after authenticating as superuser) in Linux. This file is a script that volition be run whenever Vivado is launched. Information technology will load Digilent's board files for apply in Vivado from the directory they were extracted into.Notation: You tin as well discover the path to this directory by launching Vivado and, before changing directory, running the
pwdcontrol in the Tcl Panel.Note: The script init.tcl should exist used instead of Vivado_init.tcl for Vivado versions 2016.4 and older. If multiple versions of Vivado from earlier and later on 2016.four are installed, both scripts should used.
Open up the copied init script in a text editor. Change the text
<extracted path>in the script to the path to the extracted vivado-boards binder. Save and close the file.This script sets the board.repoPaths parameter to a fixed path. The script is run whenever any version of Vivado is launched, and the parameter for that version of Vivado volition remain set after you are done with your session. This means that by installing the script, y'all are setting the board file repo for every version of Vivado you are using, and the changes volition remain fifty-fifty after the script is potentially deleted in future. You tin can e'er clear the parameter later on with the command
set_param board.repoPaths "", again, this persists between sessions.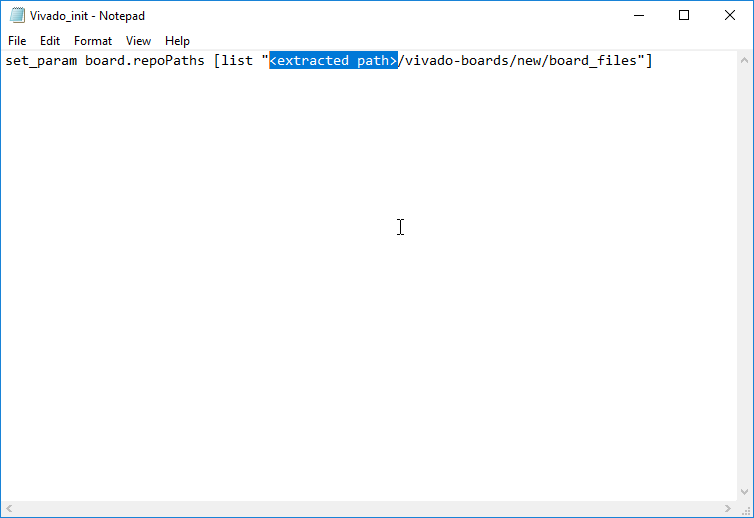
In Conclusion
With Vivado, Xilinx SDK, and Digilent's board files installed, you lot are ready to start developing FPGA projects! To offset learning how to use Vivado, bank check out ane of the tutorials below:
Source: https://digilent.com/reference/programmable-logic/guides/installing-vivado-and-sdk
0 Response to "How to Read in .dat File in Vivado"
Enregistrer un commentaire